


Work Flow: V-ray for Sketchup
Introduction
Here is a quick tutorial to show how you can achieve realistic carpet material by using V-ray for Sketch-up 1.49.01. All you are going to do is add a displacement effect to the surface so that we can improve the details of the surface in the final render.
For this excercise, I recommend you use a surface with round edges and smooth bumpy surface, instead of a flat and squarish, so you can get a better look and realistic feel.
LETS GET STARTED!
1. First Step is to create a default material

On your material editor under the "Maps" category, Check the Displacement box so you can enable the displacement options for this material. Next, click on the M beside your displacement to open the texture editor.
Here is your Texture Editor.

- Select "Texsplat" from the drop down menu (produces a texture with white dots
on a black background)
- Change your iterations to 10 (to increase the repetition of the texture)
- Change your size to .005 (to decrease the size of the white dots on the texture)
Click preview if your satisfied, or change the settings more to your liking. Click OK

4. Back to your mapping options
- Increase your displacement multiplier to 3 (or more) to increase the height of the
displacement effect.
-Uncheck "use Globals" to keep the displacement settings to this material only.
-Change the "Edge Length" to one, this setting controls how thin your carpet strings will
be, the lower the value, the thinner the string.

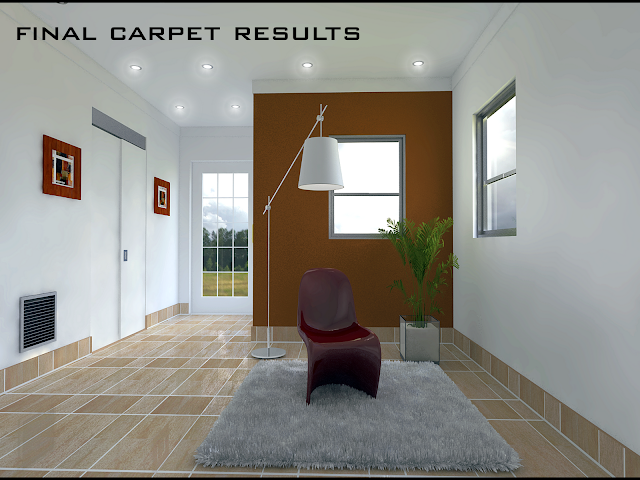
This is how your material preview should look like, and when you apply it to your surface, it should look something like the image below. Remember, instead of a white diffuse color you can also add your texture mapping so you can get a different look, with that said the possibilities of what you can create are endless.
TIPS TO REMEMBER
1. Use a more defined geometry shape, one with smooth curvy edges and bumpy surface.
2. Play with you "edge length" and "displacement" values.
Thanks for reading this tutorial, and i hope it helps you in creating your realistic scenes. I'm learning vray just like everyone else and just want to share what i learned. :)
Hey there, man there are allot of tutorials out there, and you say you are new? I have never seen this! And for it to work RIGHT away was really awesome! GOOD WORK!
ReplyDeleteN-3D: Create Realistic Carpet In V-Ray For Sketchup >>>>> Download Now
Delete>>>>> Download Full
N-3D: Create Realistic Carpet In V-Ray For Sketchup >>>>> Download LINK
>>>>> Download Now
N-3D: Create Realistic Carpet In V-Ray For Sketchup >>>>> Download Full
>>>>> Download LINK AO
thanks t3true, glad i could help. you have a great website by the way, love the work you put in it!!
ReplyDeleteit doesn't work for vray 1.48?
ReplyDeletesad =(
works but takes like ages :(
ReplyDeleteHey anonymous, i dont have that version of vray anymore, is it different from the tutorial?... rendering displacemnt does take some time, but not too long if you have the right settings..:) thanks for visiting
ReplyDeleteI have tried it again,, yea it works, but I could not render it up close because it can be very long long process, and may be error =(
ReplyDeletecould you tell me what's the reason?
hello
ReplyDeleteThx for the tutorial great work
Hi, thank you for this tutorial!
ReplyDeleteThe weird thing is, the 'carpet look' does show up on my preview, but not after rendering it! What could I be doing wrong? I have made an jpg of a photoshop file, imported it in Sketchup and then did this tutorial.. Thanks in advance..
i made this carpet with motif but not very realistic, i follow every instruction. can you tell me whats wrong? and what i have to change? before : http://i1214.photobucket.com/albums/cc487/tanya_aj/b.png after : http://i1214.photobucket.com/albums/cc487/tanya_aj/1-1.jpg
ReplyDeleteThank you so much! This was such a great help. Other tutorials are too complicated to understand, this is by far the best and simplest one I found. Thanks for your efforts ^^
ReplyDeleteGreat...!! This really help and simplest.. Thank so much for share this.. ^·^
ReplyDeleteGreat...!! This really help and simplest.. Thank so much for share this.. ^·^
ReplyDeleteyou are welcome :)
DeleteThanks, This is really helpful.
ReplyDeleteThank you very very much.My exhaustive search for this material, since so long, on net ended with your this step by step tutorial. once again thank you.
ReplyDeletethx man, it worked !
ReplyDeletewow.... your site fulfil my all requirements..thanks for this amazing information....Vray 2.0
ReplyDeletedoenst ork :(
ReplyDeletevray 2.0 for sketchup Thanks man. It works perfectly.
ReplyDeleteThanks for the always useful information. This is great information to help garage type SEO people like me.Vray 2.0 for Sketchup 2017 Crack 64 Bit
ReplyDeleteThank you very much it is an useful information for the 3d beginners, animators and artist. The tatics which are used in this model may be useful in future projects .
ReplyDeleteBoat steering wheel
To see more click here : Boat Steering Wheel
Framed pictures
N-3D: Create Realistic Carpet In V-Ray For Sketchup >>>>> Download Now
ReplyDelete>>>>> Download Full
N-3D: Create Realistic Carpet In V-Ray For Sketchup >>>>> Download LINK
>>>>> Download Now
N-3D: Create Realistic Carpet In V-Ray For Sketchup >>>>> Download Full
>>>>> Download LINK